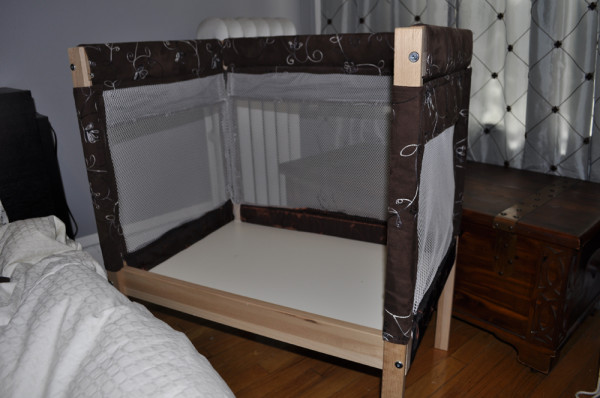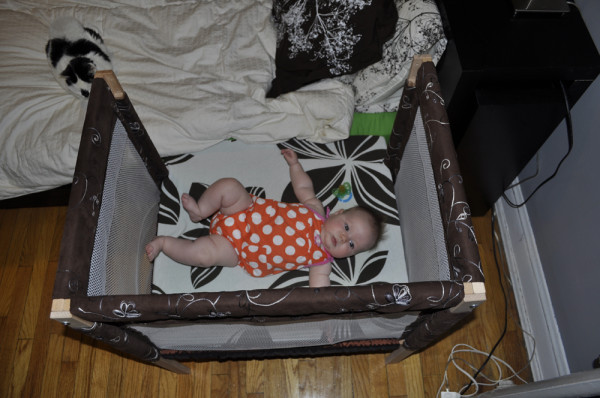
Before we had the Bot, I had planned on her sleeping in her crib from the start. Yeah, I should have known better. The first night home we set up the hand-me-down pack-n-play in our bedroom and attempted to let her sleep in that. I think I made it through 2 night feedings before I gave in and put her in our bed. And thus started my complete and utter lack of sleep.

See, our bed is just a queen and in no world is a queen-sized bed big enough for 3 cats, 2 adults and 1 newborn baby. We looked at co-sleepers and couldn’t find anything that worked because our platform bed was too low to the ground. We attempted to use these foam rails, but they ended up just taking up more room. We needed a co-sleeper badly and finally decided if we can’t find one, build one. But hey, if you can find an Ikea product to hack into one… even better! And that’s just what I did.
Want to know how I hacked the Sniglar Baby Changing Table into a Co-Sleeper… then read on.
Before I begin, let me tell you this… You should do this before having your baby. Or at the very least when you have someone home to care for baby while you focus on this. It takes a lot of time, thought and patience and it took me about 2 weeks to build because I didn’t have any free-time to do it. I’m sorry I don’t have the totals for you (ie 1 yard this 1 yard that) I bought a large amount in case I messed up – which I did on the first try so I don’t know the totals of each fabric.
Right, so here’s what you need if you want to do this:
 We turned a bedroom into a crib for a formerly co-sleeping baby
We co-slept until my daughter was eight months old. It was an amazing experience for me, but she started teething at eight months. As the... Read more
- 1 Sniglar
- High density foam
- Nylon netting
- Heavy/tough upholstery fabric for the top rails
- Nylon lining
- Batting
- Thin satiny upholstery fabric for the bottom rails
- 35″ x 33″ Cotton fabric – for flat sheet (You probably want to make 2 or 3 sheets)
- Sturdy good quality upholstery thread – a lot
- 1 Package 1/4″ elastic
- Sewing machine
- Measuring tape – to measure out all your cuts
- Scissors – to make all your cuts
- Pins – to pin together your cuts for sewing
- Lots of patience (and a very tolerant partner)
First I prepped all the Top & Vertical Rails. Each one should have 1 Heavy upholstery fabric and 1 Nylon lining fabric with 1 Piece of batting sandwiched between them. This gave me a total of 3 Top Rail pieces (2 Top-side and 1 Top-back and 4 Vertical Rail.
Next, I hemmed all the Top Rails, Vertical Rails, and Bottom Rails (thin upholstery fabric).
And now the assembly!

I took one of the Top-side Rails and one of the Side Net pieces. Folding the Top-side Rail piece so one side is longer than the other by about 3″. See the image and you’ll notice the outsides of the top rails are longer than the insides. I fit the netting in between the two, pinned then sewed twice – once at 1/2″ and once at 1/8″. I repeated this for the other two panels. Next I sewed on the bottom rails. Folding their 13 1/2″ side in half with the netting in between making sure it would be taught when assembled.
Up next – the Vertical rails. These I wrapped around their bars to find out where to pin and sew together making snug sleeves which left approximately 1 1/2″ – 2″ beyond the stitch. For the rails that were on the outside edge of the side panels (not sewn to both the side and back panels) I simply fit the side panel between these two edges as tightly as possible and sewed twice. For the Verticals that go between the back and side panels sew one edge to the side panel and one edge to the back panel. See the image.

Then I fit it all the sewn rails on to the right bars. To assemble I put all the vertical pieces in, then the top and bottom pieces, laying them out ready to be assembled. I assembled according to the Sniglar instructions except I did the non-sewn side last and left the top rail off all together.
When completing the assembly, leave off the top shelf and the top crossbar that has no fabric on it you won’t be using them at all. Don’t worry, you haven’t compromised the structure at all. It is hard to get the bottom shelf into the slits with the thin fabric covering them, but it will go if you’ve found the right satiny thin fabric. The bottom rail with no fabric also takes some work to get on since you’re not assembling the way Ikea intended.

To make the mattress I used 4″ foam cut to 26 3/4″ x 24 1/2″. I set the foam into the Sniglar and marked where the uncovered bottom rail hits. Then I cut a groove the length of the foam as wide as the rail and as deep as necessary to get the foam to lay flat.
I made some sheets using cotton fabric that went nicely with the co-sleeper and our bedding. Here’s a tip I learned in a sewing class, feed the 1/4″ elastic through the slit in the presser foot when sewing it on the sheets, it let’s you keep it straight, pulled tight and is super easy to handle. Check out our flickr set which has an image of what I’m talking about.
If you want to see more details of the Co-sleeper, hop on over to our flickr set.


Curse you and your absolutely perfect, genius solution to a problem I no longer have! Seriously, five years ago this would have saved me a butt load of trouble. We bought the mini co-sleeper thing that Dr. Sears hocks and it never worked with our platform bed. This hack is truly a stroke of genius.
you should sell these! It looks divine!
nice work! We rigged the arm’s reach co-sleeper enough to make it work, but it was kind of pricy and not as easy as I had hoped at all.
friggin’ fantastic and seriously marketable! If we have number three, I’m totally looking you up 😉
genius.
We used the Ikea Gulliver crib on the lowest setting, minus one side of slats. It was very stable, and even though I had planned on lashing it to the bed frame, i found that if I just pushed the bed so that the crib was tightly wedged between the wall and the bed, that sucker wasn’t moving anywhere. It did suck to have to scoot down to the end of the bed to get out, especially with a C-section to recover from. In the end I usually slept with myself on the outside edge, baby next to me, long fat breastfeeding pillow (skinnier than a body pillow but just as long), then my husband on the opposite edge (we did the pillow since he was terrified of rolling over or hitting her with his arm when he slept). I was always hyper aware of her, and frankly, didn’t sleep all that well during the months we had her with us. I’m totally glad we did, especially since I didn’t have to get up to breastfeed (though I did need to sit up, never could get the hang of it lying down) but I do miss listening to her breathe and snuggling her tiny warm body… I can definitely see why people sleep with their kids in bed with them for years! (I’m glad we don’t have a kid in our bed kicking me all night!!! But I can see the appeal of having your child’s little warm body next to you :-))
Wow, I’m so impressed!! Nice job!