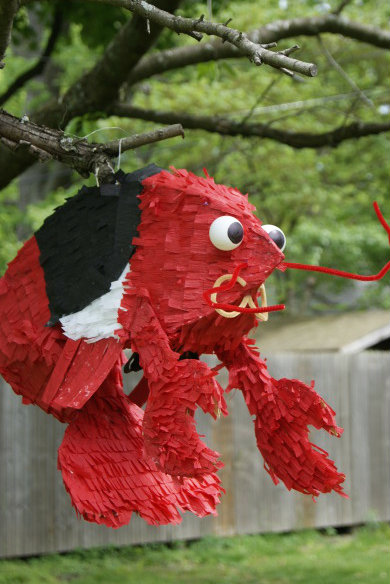
The fella and I decided we wanted to have an Awesome Wedding Piñata. Sadly, the options at the party store did nothing for either of us, and the usual "Coat a balloon in papier-mache!" method didn't seem likely to render a suitably Awesome result, fit for any party.
So I mashed together a few different online tutorials, and I now share the magic!
MATERIALS:

- large cardboard box
- empty cereal boxes or similar lightweight cardboard
- 1 newspaper, torn into 1"-wide strips
- crepe paper party streamers in various colors (I used red, black, and white)
- Elmer's school glue
- masking tape, scissors, marker
- papier-mache paste Related Post
 Make these DIY crystal bottle stoppers
Right? Cupcakes and Cashmere has the tutorial on how you can transform a little epoxy, a pretty stone, a cork stopper and into something super... Read more
Practically Free Papier-Mache Paste: Combine 1/2 cup all-purpose flour and 2 cups cold water in a bowl. Add this mixture to a saucepan of 2 cups boiling water and bring it to a boil again. Remove from the heat and stir in 3 tablespoons of sugar. Let it cool; it will thicken as it cools. Once it does, it's ready to use.
DIRECTIONS:
1. Decide what your Awesome Wedding Piñata will look like. We went with a crawfish wearing a tuxedo, because that's how we roll in Louisiana.
2. Draw the basic outline of your shape (in my case, minus any protuberances like claws, legs, and tails) onto your flattened large cardboard box. Cut it out, then trace it and cut out one more to make two identical shapes. These will be the sides of your piñata.
3. This is the fiddly part. From the thinner cardboard, cut out long pieces to make the top and bottom of your piñata. High-tech 3D results! For mine, I used strips that were three inches wide, and tapered the ends to make a pointy nose and tail.
4. Assemble your cardboard sides and strips from the cereal box using plenty of masking tape, matching the edges neatly. Leave a flap open and untaped at the top.
5.  Using masking tape and glue, attach any major protruding bits, like tail fins for your crawfish. Or a dorsal ridge for your dragon. Whatevs. Your final product will look a mess:
6. Elementary school flashback time! Cover your nascent pinata in newspaper strips coated with papier-mache paste. This evens out the seams, gives you a nice base to work with later, AND strengthens the final product to drunken-adult-resistant levels. I had the fella do this part, since he likes to make messes like this.
7.  Run a wire or sturdy twine through the top of the pinata so it will hang, and then let it dry. At this point, my crawfish looked like a shrimp, but I had faith!
8. While it's drying, use the remaining cardboard to cut out any minor protruding bits — in my case, legs and claws. The fella also made two big Muppety eyes out of ping pong balls.
9. Take your crepe paper streamers and stack them several layers thick.

Snip it into fringe about halfway up the long side. Unfold, and you should have a long strand of fringed paper. I also "delegated" this to the fella after a while.
10. When your piñata chassis is completely dry and rigid, attach your fancy bits with more masking tape and school glue.
11.  Working from the bottom up, glue on the fringe in overlapping layers. You will be covered in glue by the end of this. This is the price of Awesomeness.
12. Add any final touches: eyes, antennae… sequins, glitter spray, fake blood — you do you!
13. Fill with goodies and mentally prepare yourself to watch your lovely handicraft be bashed apart with a stick.

Yay!


Yay indeed!!! Your piñata looks fabulous! I like how top even cut fringe for the right texture.
Great tutorial! We have a tradition of buildings piñata to enjoy with our friends on Thanksgiving. It’s the perfect post dinner pre pie break. We havent tried making it out of a box. Usually we tape balloons together in our rough shape and do a couple of layers of paper mâché while adding in the cardboard limbs and whatnot. The crepe paper fringe is TOTALLY worth it, even if you get covered I glue. The sooner you can get it hung up to work on the easier will be. And get creative with the fillings! We have done adult themes, jokes or quotes on little rolls of paper, small toys and of course candy!
This is fantastic – thank you very much for sharing your brilliance!
Yay pinata making! My friends and I hold an annual pinata party. Traditional fills?
~Dark chocolate
~Hostess snack cakes
~Nips (plastic bottles only)
The snack cakes protect the nips pretty well, and it’s a GREAT time.
thank you for this! Can you tell me how big is came out to be?