Jasper’s in the very beginning stages of creating “art” for Sean and I (usually at the prompting of the other parent). He’s old enough now to attend story times that also incorporate crafts, so he usually ends up “making” something (with lots and lots of help from whichever parent he’s with, or both of us) while there. I’m using lots of quotation marks because homeboy’s not even two yet, so his creative process consists of scribbling, and he’s getting oodles of help from us.
Even though we don’t have tons of it yet, I forsee a day where we will have so much of Jasper’s art that we’ll literally run out of places to put it. I can’t stand the idea of throwing it away, even if it doesn’t exist yet, and shutting it up in boxes to languish for decades seems equally sad. I started looking up different ideas about what to do with every bit of brilliance that my kid and yours will create, and stumbled upon a few of these:
Turn it into jewelry you can wear!
Suzi Cook runs the Etsy shop Frills and Whimsy, and she can turn those priceless creations into a ring or necklace that you can keep forever. I was so stoked when Kait sent me this link a few months ago, and am happy to have a way to share it with you. Prices range from $68-$98, so I wouldn’t suggest doing this with every single thing, but how perfect would it be to keep that first drawing forever?
String it up on a clothesline.
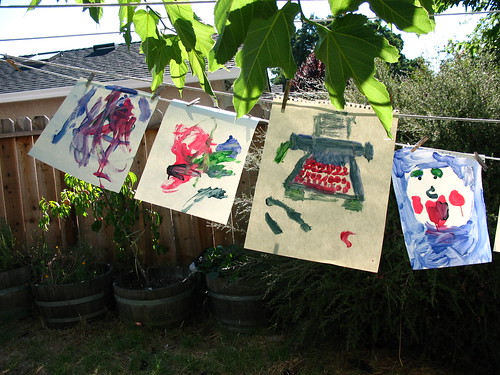
I love this idea because you can put it pretty much anywhere — in their room, across the entranceway to the kitchen, even as a room border or outside! Clothesline and clothespins are crazy easy to buy just about anywhere, and you can also find them online (bonus points: you can get the pins in natural or different colors!) if you don’t like shopping away from your home. Thanks, Internet. You rock.
Turn it into a puzzle.
After your kid’s finished and you’ve all oohed and aahed, nothing says “I’ll cherish this piece of art forever” quite like chopping it up into corresponding pieces and making a puzzle out of it! For durability, find out where you can get it laminated (preferably before you chop it up). That way it can’t be destroyed too easily, and the puzzle could be handed down to other kids/friends/relatives/etc. Or, you can just keep it and pull it out while working if you need a sweet distraction or break.
Use it to wrap gifts.

Gone is boring store-bought paper! How sweet would it be to have your child(ren) draw Nana a picture to wrap her birthday gift in? You could scan in the drawing and print it on larger paper, or even just have your kids draw on white backing of regular wrapping paper. If you want to go a greener route (yay!), you can get recycled printer paper online OR a recycled newsprint art paper roll, which can be decorated with crayons, oil pastels, colored pencils, and markers.
Get it tattooed on you.
I’m all about parent tattoos! This might be a bit extreme for some, but I’m pretty sure it doesn’t get more permanent than this. Depending on the size of the piece in question it could take a few sittings (I can’t even imagine, my tattoo was 20 of the most agonizing minutes of my LIFE), but if you’re into it, it’d be well worth it!
How do you guys save your kid’s artwork? Give me ideas!
my firstborn is 12 – trust me, eventually you’ll be ok with tossing things in the recycling bin.
i have: embroidered his drawings onto pillows, shrunk them & turned them into magnets, slipped them into protectors in 3-ring binders, given stacks to grandparents, taken photos of 3d creations, & currently i’m scanning his paintings to have them printed in an actual book.
Yes, by the time they’re like…8, you won’t feel compelled to keep every scrap or doodle anymore.
My advice is to cut down on clutter, only keep a FEW cute/sentimental scribbles. Kids, once older, aren’t particularly interested in preserving everything they’ve EVER done, just keep a few a la “here is a drawing you did when you were 6.”
In organizing books I’ve read, I’ve heard of taking photos of the art (and/or of the child with the art) and putting the photos in a scrapbook and photo album. But this tip is more for if you can’t bear to part with the art but you’ve run out of room and need to make room for new art. So you record the memory and let go of the actual art piece.
This works with keepsakes, outgrown clothes, furniture too – anything that’s hard to let go but you need the space (journal and/or take photos of the item to retain the memory but let the item go).
we got a cheap drop cloth at lowes, bustedout the acrylics, andlet out 11 month old paint. he covered 90% of the drop cloth and 99% of himself. it is now the largest piece of artwork in our home and currently resides in his room because he loves it so much at 3 years old. paint and babies is fun.. if you take the right precautions !
My son is 6 and has a natural talent for art (his favorite is oil pastels but he’s best at watercolors). His real peices of art, we keep in a binder on the coffee table but his doodles and scribbles on random peices of notebook paper are his responsibility. Every evening I have him gather all the papers and decide which to keep and which to toss out. That way his feelings aren’t hurt if I throw something away. Also, it helps him recognize the value of working hard on a peice of art in class because it goes on the fridge/table for everyone to see. The crayon doodle of Superman doesn’t need to be cherished.
When your child draws as much as mine does, you simply can’t keep it all.
If you find yourself with loads and loads of drawings and letters from your munchkins, you could scan all of them into your computer, then go to lulu.com and make a book out of them. There are different types of binding you can get, and it would be kind of fun for kids to see their art in ‘real’ books.
When they are little a scrap book with the drawings saved in it is a great way to keep a bunch in not too much space. you could let them decorate the front of the book and it will be a great keepsake when their older. I draw a ton, and when i was a teenager my mom helped me start a portfolio. I have one for each year of highschool and they are awesome to look at now that i am older. it also taught me the value of things i worked hard on
I take pictures for the year and then upload all of those pics of her artwork to walgreens.com or mypublisher and create a hardbound book of all her art work..the books aren’t very big but then you get to keep it all!
I was going to suggest the same thing! I’m a play therapist, and we always take pictures of children’s art and sand tray creations to put in their files. I imagine doing the same with my little one’s drawings when she gets bigger 🙂
Another fun way to keepa special piece of art – scan it in, print it onto the cool iron on transfer sheets you can get at office supply placesand iron onto a plain t-shirt. Wearable art and original clothing! I got the idea at a Christmas gift exchange that required all gifts be homemade – a friend’s toddler, 3 year old Oliver, brought a tshirt emblazoned with a piece of his abstract awesomeness and it was a hit. He was pretty happy to take home some chocolate chip cookies in exchange and the shirt looks awesome on my hubby.
Another expansion of the iron-on transfer method is to buy plain bedsheets or pillow cases and decorate those with the ironed-on images. You can then use them as bedding, or layer two together with batting in the middle to make a quilt. I helped one of my mom’s friends with that last summer. We also took the baby clothes she’d saved from her son (now 15), cut up the more sentimental pieces, and made them into a quilt. That way she can be wrapped up in the baby memories as he grows up and heads to college. Plus, it freed up a ton of space in the garage and helped her let some other, less-loved pieces go to charity. I totally plan on a baby clothes quilt when my little guy gets big. I just have to get beyond the need for hand-me-downs first!
These are some fantastic ideas! My son is four, and in pre-school, so he’s always bringing home artwork. I am definitely going to put these to use!
I’ll echo some of the other comments – I’ve always planned on taking pictures of our dude’s art and making a photo album of the art pictures.
The book “The Creative Family” has a lot of ideas for saving and using kids artwork. I haven’t actually used any of them yet, because Aspen has only just started her first drawings.
We keep the best pieces of our kids work, hang it on the wall for a while. Then, we scan these pieces before, um… recycling them. One year, we took some of the scanned images of the kids’ “seasonal” art (you know: the school painting projects like Halloween jack-o-lanterns, Thanksgiving turkeys, snowflakes and the like), and uploaded them to Snapfish and made a seasonal-appropriate 12-month calendar for the following year. We gave these calendars as Christmas gifts to our family. The grandparents especially appreciated looking at a new piece of art, every month, that had been produced by their grandkids. Great vehicle for bragging to their friends.
Stephanie: Your tattoo took only 20 agonizing minutes? When people ask me about my ink, “did it hurt?” I tell them that, on a scale of 1 to 10, in which 1 = a hangnail and 10 = unmedicated childbirth, I’d say that getting a tattoo ranks about a “3,” OK, maybe a “4” or “5” if it’s on or near your spine. 😉
This is what I did when I was little: http://www.creationsbyyou.com/kit/PlateWorks.asp
I’m not sure if my parents still have any of these plates, but they were awesome to have growing up. I was eating off a plate that *I* designed! So very cool.
Right now we do a few things (our daughter is only 4 so the object count isn’t too high yet)
1) I have a girlfriend with a programable embroidery machine who scans the favorites and makes quilts out of a collection of images.
2) We take pictures, like so many others, of all her pieces and load them to one of those electronic picture frames that rotates them and is dedicated to solely her art.
3) I try to encourage “practical art” where it’s visually beautiful //and// a practical item – Our travel mugs are the kind with the insert, when my daughter does a new drawing we cut out her favorite part and use it to make mommy a “new mug.” When she wants to paint I give her a birdhouse or flower box instead of paper that way after we seal it, it can be used in the yard or a window.