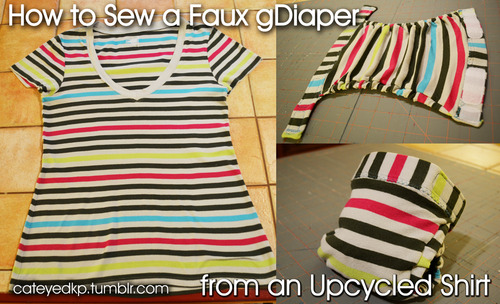
Today I’m going to show you how I make my upcycled mock gDiaper cover. This tutorial features a size medium diaper.
For this project you will need:
- A large knit shirt (or knit/cotton interlock fabric)
- One 1-1/4″ sport knit elastic for waistbands
- 3/8″ knit elastic for leg elastics
- Snap tape — these are compatible with the brand name liners and can be purchased here (the evenly spaced tape with 1 1/8″ between each snap)
- 11″ of hook and 5″ of loop touch tape or Velcro (I used Babyville from Joann’s)
First, go here and scroll down to the bottom of the page. Print her PDF pattern, cut out the pieces for the body and elastic casings, and tape them together. I don’t make the nylon liners, so if you don’t intend to make your own PUL liners, you don’t need to cut that part of the pattern out. If you want to learn how to make the liners, she includes it in her instructions.
You’ll need a knit shirt — preferably with 96%-100% cotton content, though any quality knit fabric could work if your baby isn’t sensitive to synthetic materials. I found a large cotton Old Navy shirt for half off at Goodwill. If you are able to snag a long-sleeved shirt, that’s even better. The sleeves provide extra fabric for elastic casings. If you are hoping to make more than one diaper out of your shirt, remember that the bigger the size, the more fabric you’ll be getting, so start your fabric search in the plus size department and go down from there.
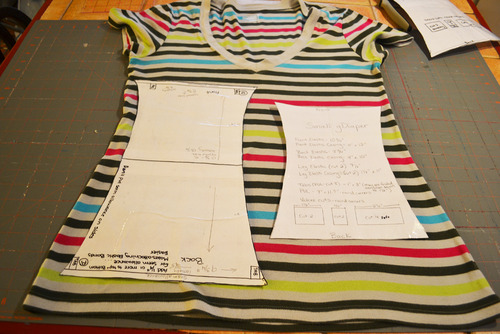
After washing and ironing your thrifty find, lay it out on your work surface. I like to place my pattern down on it in a couple of different ways, to see how I can maximize my fabric (though for the body pieces, you do want the stretch of the fabric to be horizontal, not from front to back). Here’s a comparison of my small pattern and the medium pattern on the shirt:
 What’s the best way to make your own cloth diapers?
We're currently expecting our first, and on a bit of a tight budget. My wonderful Mum has offered to make cloth diapers for us, but... Read more

Next you need to take your shirt apart. I cut as close as I can to the side seam, remove the sleeves, and collar if needed.
I kept one of the side seams attaching the body together before tracing and cutting my pattern pieces. You need to cut two of the body fabric, two leg casings, and a front and back elastic casing.


Here are your cut pieces, plus the elastic, touch tape (velcro), and female snaps.

In the pattern, the author mentions that her baby is on the larger side, so I took an inch off her leg elastic measurements and cut them to 9″ instead of 10″.
Now that the cutting is done, it’s time to get sewing!
First, sew your leg elastic casings together. Fold them in half right side facing out (you won’t need to flip these) and sew them together as close to the edge as you can.
Do this with both casings. Next, lay out your body pieces. You will be sandwiching the leg elastic casing between the top and bottom body pieces, and sewing them all together at the same time. Before you do this, you need to make four marks on each of your body pieces. Measure approx. 1 3/4″ down from the top and bottom edges of your body with a fabric marker. This is where you will start and stop sewing the sandwiched fabrics.

Lay your bottom body piece facing up, then place your leg elastic casing with the cut side facing out and line it up with the edge of the body fabric. Add your second body piece facing down.

Begin sewing at the mark you made about 1 3/4″ from the top. Be sure that all three layers are being sewn together, using a 1/4″ seam allowance. I tend to be lazy and skip pinning wherever I can. You can skip pins in this step if you check as you go that you are catching all of your layers. Stop sewing when you reach your bottom mark.
Repeat the above steps with the other leg elastic casing. The body of your diaper is beginning to take shape.
Flip the diaper right side out. Mark your leg elastic casings about 3/4″ from the top and bottom. This will be where you tack down your elastic.

Thread your elastic through the casing using your preferred method. I love the plastic flippy tool you can get at fabric stores that is designed for just this purpose. Make sure your elastic is as far over to the folded end as you can and isn’t twisted, and tack it down at your markings.
Flip the diaper inside out again. Now you will be tapering the leg elastic casings out so when the body attaches to the waistbands, you won’t need to contend with the extra width and bulk of the leg elastics.
Put your needle into your three layers of fabric about an inch away from where you stopped sewing before. Make sure your layers are nice and flat.

With your needle in the fabric, you will want to pull your elastic casing to the side while keeping the body fabric straight. Leave about 1/4 of an inch that won’t be sewn together at the end of the body. The point of this is to taper the leg elastic away before it reaches where you will attach the waistband.

Do this for all four edges. Trim the excess so your seam allowance is even for the whole diaper. Flip the diaper right side out.

Hooray! You’ve attached your leg elastics, and the body of your diaper is sewn together!
Next we need to cover the waistband elastics. Fold your elastic casings in half with the wrong side facing out.
Take a straight edge, measure how wide your elastic is (in this case I used a 1 1/4″ elastic) and mark a line down the casing where you will be sewing.

Set your sewing machine to the widest possible zig-zag stitch, and zig-zag the casing together. Trim the excess as close to the seam as you can without clipping it.

Flip your casing right-side out, and thread your elastic through. Make sure there is an equal amount of excess fabric over the elastic on each side. You will fold this excess in a triangle and sew it down to close the casing.
I used a zig-zag stitch to sew it down, but you could use a straight stitch if you prefer. This seam will show on the outside of the diaper so it’s up to personal preference.
After you have done this for the front and back waistbands, we are ready to put the whole thing together! Lay out your front waistband and the body of your diaper. The narrower end of the diaper attaches to the larger waistband — this is the front.

Fold the two body layers of the diaper under themselves about 1/4″ and pin the middle of the diaper to the middle of the waistband. Your raw edges will be hidden under the waistband in the front, giving it a polished, finished look even on the inside of the diaper.

Double check that you are not folding it too much by flipping it over once you have put in a few pins — if the raw edges are peeking out from under the waistband in the front, unpin it and fold them less. Work from the middle out to the ends. Once you get to the end, you will want to fold the corner under, and then fold the point under itself, so all of the raw edges are folded and pinned under the waistband.

Straight stitch slowly and carefully as close to your folded seam as you can. At the beginning and the end, be sure to turn and top stitch your side folds too, so they stay down.

Once you have sewn the whole seam, you can remove your pins. Next, flip the diaper to the front and set your zig-zag to the widest setting. Sew along the bottom edge of the waistband, permanently enclosing your raw edge under the band.
You can do a mini happy dance at this point, because we are in the home stretch!

Now, for the finishing touches — Velcro and snaps.
Trim down your Velcro pieces so they fit nicely on your waistbands and round the corners so they won’t poke your little one. They won’t be perfect, so don’t stress over it too much.
The scratchy pieces always go on the outside edge, and the soft pieces on the inside. On the front waistband, the Velcro faces inside the diaper and on the back waistband the Velcro faces outside the diaper.
I don’t want to admit how many times I have happily finished sewing my diaper when I realize that I sewed all of the Velcro on the inside, and have to seam rip it off the back and re-sew it. It’s a buzzkill — so remember, Velcro is sewn on the outside of the back waistband.
Sew your pieces as close to the edge of the Velcro as you can. On the front, you can use the Velcro seam to also attach your pieces of snap tape.
This is the front all sewn with the snap attached:

When attaching the snap tape to the back side, I like to line up my seam with the seam that attached the body to the waistband. The Velcro pieces on the back won’t attach your snap tape, so you just need to sew them on individually. I find it helpful to pin down the snap tape so they don’t get caught by accident as you sew on the Velcro.
Ta da! You are all done!
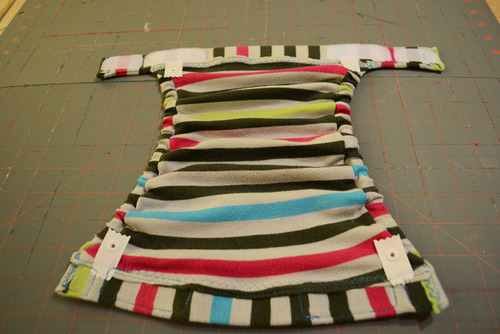
Here is what the inside should look like:


Oh wow this is SO adorable! But pardon my confusion in asking… gDiapers are disposable. Is this intended to be used as a cloth diaper, or did you mean it’s a faux-gDiaper cover? Thanks for the clarification! I am totally pinning for the future <3
My understanding is that this is a cover, which you could use with a cloth diaper or a gDiaper insert. I’ve clarified the title.
gDiapers are a hybrid cloth diapering system. The outer shell (cover) is made of fabric and as such is reusable/washable. The gDiaper system also uses a detachable plastic liner, which acts as the waterprood layer. In the pictures above the added inside snap is used to attach/detach the plastic liner. For absorbancy you can use a diposable gDiaper insert or a resuable cloth insert (such as a prefold or other cloth diaper insert).
The author replicated the gDiaper cover in her own fabric/print.
I use cloth diapers, but not gDiapers in particular, so maybe this is obvious, but there’s no waterproof barrier. Do gDiapers not have a waterproof lining or something?
The snaps which were added at the end are to snap on a detachable plastic liner. On top of the liner you would add your prefold/insert.
Ah, okay, got it. Thanks for the clarification. I’m just becoming aware of how complicated and different cloth diapering systems can be!
Cloth diapering has a learning curve. I like to think of it this way – there are advertisements on tv, in magazines etc about how disposable diapers work but you do not turn on your tv and see the difference between a pocket style cloth diaper and an all-in-one. As complicated as it may seem all cloth diapers are the same. They have an aborbant layer and a waterproof one (whether that be PUL or plastic, wool or fleece). They might be all in one diaper or come in different pieces (like a fitted and cover). If you keep it simple it doesn’t seem that complicated (although people do try to make it seem that way). Hope that helps 🙂
If we want to get technical, these are faux “gPants”. The gDiaper is comprised of three main layers- the gPants (outer fabric shell), a snap-in nylon liner that is waterproof, and either gCloth (reusable absorbent cloth to catch the fun stuff) or a disposable gRefill.
Emily has a very helpful post on her blog that should explain any questions about the g system:
http://www.joyfulabode.com/2010/09/26/gwhiz-gdiapers-101-the-anatomy-of-a-gdiaper/
I hope this clarifies!
Maybe this is obvious to gDiaper users, but what is the point of splitting the outer part of the diaper into two parts like this, with the fabric shell and the waterproof liner being separate?
Maybe it’s to save the waterproof layer from getting worn out in the wash. I haven’t used gDiapers so I might be wrong.
Yes, It’s to prevent excess wear from the washer and more importantly, the drier. I let mine air dry. Also, if you have a good fit the gpant (cover) won’t get wet and you can switch out just the cloth insert, or both the cloth and the waterproof part if its smelly. This way you can use some gpants more than once before the wash and end up needing fewer.
I love this. Even though I don’t use gDiapers, I will if someone makes me a bunch of these. Any volunteers? 🙂
I just have to comment and say WOW! I wish I had those sewing skills. AMAZE. So impressed.
Best photo tutorial EVAR!
I use the long sleeves to make extra matching leg warmers 😀
Would anyone know how to make the pattern into a newborn size? I love the idea to add to my stash of larger sizes, but honestly cannot afford a stash in newborn size and would love to know how to make them!
I made a newborn size by printing out the pattern at 75 percent (the medium is 25 percent bigger than the newborn). The only thing I noticed as a problem was the width of the leg elastic casing. I had to make it wider to handle my elastic, but the length worked. Leg elastic is 7.5 inches and the back and front elastic are both 10 inches. Compares in siize to a newborn pampers. My first grand baby is due February 24th
I love making the diapers but need some help with the PUL liners…. how much fold over elastic is needed for each liner and any hints when sewing this
I’m sorry Peg, but I don’t make the liners. I tried to make 2 of them and it was too hard to get them to come out correctly. How much FOE you would need would depend on how tightly you pull it. Sorry to not be more help!
What dimensions did you use for the liner? I’d be interested in trying to make some for my daughter as I want to go back to cloth.
At the very top of the post is a link to a medium sized pattern, which I used for the tutorial. She includes a pattern for the liners too (which again, I don’t make). Good luck!
This is fantastic. I really appreciate the tutorial. These diapers are expensive… what a fantastic alternative!
How do you get the small size from this pattern. What about Large?
Could please share the patter?