 The laundry room has been a sticking point as we put together our house. I don’t have a true “before” picture for you because it was such a cramped, cluttered nightmare that no one would want to see it anyway.
No, really.
U to the G-L-Y.
It started to get SO MUCH BETTER when we scrambled a washer to stack on top of our dryer. It may not look like much, but it’s already so much better because there’s actually an inch or two of floor-space that’s not taken up by some machine or another (the old dryer was where you see that piece of wood).

Okay, so why the laundry room history lesson?
Well, as much as I loved having room to, oh, I don’t know, not have to turn sideways and suck in my gut just to walk into my own laundry room, I wasn’t quite as thrilled about how dingy my washing machine looked next her sparkly new dryer-sister.
And I’ve always wanted to have a colored washer/dryer, but I’m not keen on the prices at all. So, what’s a DIY-obsessed girl to do? Paint her washing machine, of course!
Materials I used
- A stencil by Cutting Edge Stencils
- A stencil level or a regular level
- A small foam roller
- Paint! More on paint below.
I stumbled across a pretty teal color called Virtue (by Dutch Boy, I think) and some leftover Dover White (Sherwin Williams) in our shed, then grabbed some leftover oil-based Kilz primer that I used on another project, and set to work.

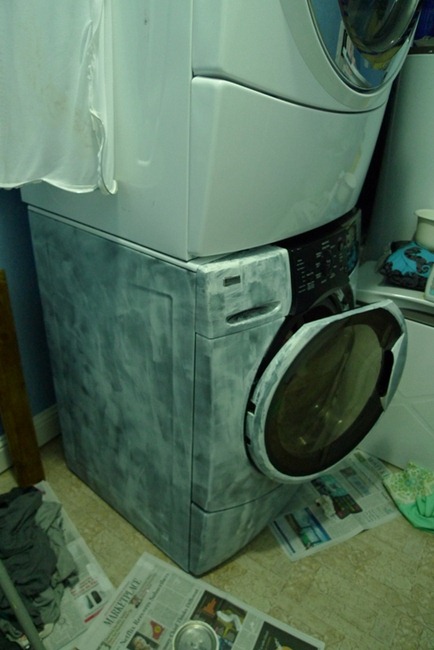
Here’s Henrietta (she’s the washer) after a quick coat of primer.
It dries super-fast, so that same night, I started rolling on the teal.

It took three coats, and I used a tiny craft brush to do the detail work around the Kenmore logo and the washer door, but it still didn’t take longer than an hour total.
After a brief flirtation with the idea of trying to paint over and re-label the control panels (I even wrote out a diagram just in case), I regained my sanity and decided to leave those black.
I was already loving the change, but I wanted to make Henrietta a bit more fun because, seriously, if you have to do a gazillion loads of laundry, you might as well have something that puts a goofy grin on your face while you’re doing it!
And few things make me smile goofily like polka-dots.
So, I unrolled my stencil and grabbed some painter’s tape and my can of Dover White.

Even though the side of my washer was far from flat (see the ridges that run all the way around the edges?), the stenciling process was a breeze.

I followed the instructions from the Cutting Edge Stencils user-friendly video, making sure to roll my paint roller on a paper towel after every time I dipped it in paint.
This step is definitely the most important: if you have too much paint on your roller, it will drip.
Here she is with the first round done.

Because I used so little paint, I could pull the stencil off, reposition it immediately, and go right back to rolling.
The entire process took maybe 20 minutes, and that includes the fact that I was a bit tentative in round one, having never used this kind of stencil before.
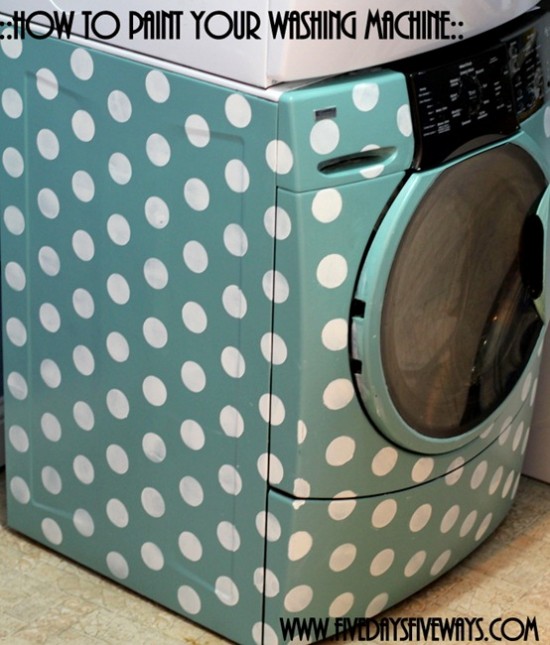
And then, I spent another 15 minutes on the front, so now she looks like this:

Okay, so I realize it’s a little batty to take a paint roller to your washing machine, but I’m actually loving that the first thing I see when I go in my laundry room is Henrietta, the teal and white polka dot washing machine.
Plus, it was one of the easiest paint projects I’ve ever done, especially the stenciling process, and I would do it again in a heartbeat…which a did, a few weeks later, when I tackled the dryer.
She was a little harder than the washer — I only primed the dots, and then had to break out a small foam brush to finish those off, but now proudly introduce you to Henrietta’s equally polka dotted sister, Helena.

Also, for those of you who might be wondering how I answered the warranty question that was my only concern in whether I should paint a shiny new machine…
It’s still unresolved.
 So, let’s hope that Whirlpool has a sense of humor (or, at the very least, a thing for polka dots).
In the end, this paint job has held up REALLY WELL. On top of the oil-based KILZ primer, I used regular old latex paint in eggshell finish after four weeks and more loads of laundry than I care to remember, it’s holding up great.
Absolutely zero chipping, flaking, or peeling off. I’ve whacked it with the laundry basket, detergent bottle, etc., and it has left a small mark or two, but I don’t know any paint in the world that won’t show marks if you hit it with something hard.
The durability is mostly because of the primer I used, which is one part paint, a gazillion parts magic, as far as I can tell, but can also be credited to the fact that I rolled on three very light coats of paint. The lighter the better to keep the paint from globbing up.
Homies, what would YOU paint on YOUR appliances? Skulls? Rainbows? Steamy gears? Glitter?! Tell us!


Very funny. I will think about painting my washer.. 🙂